
It is best to leave the installation of an automatic watering system to professionals. This will ensure that the irrigation system functions flawlessly for years.
A simpler, smaller watering system, with our technical support and advice, you can make yourself, without much prior knowledge of hydraulics. In case you buy K-RAIN watering equipment from us and want to install the watering system yourself, our engineers will draw up a diagram of your watering system for free based on the data you provide.
In addition to creating a scheme, we will provide you with all the necessary information and advice so that you can install the watering system as easily and as efficiently as possible.
You can get advice and technical support when purchasing equipment at the premises of our company, at the address:
NATURALIST d.o.o. Belgrade, Petra Konjovića 12-ž or by calling one of the following numbers:
We need the following information to create a project or scheme for your garden watering system:
- A garden project to scale or a sketch with the exact dimensions of the garden to be watered, with existing and planned plants, objects, paths, slopes, important elevations, fences, walls and other objects that can be obstacles during watering.
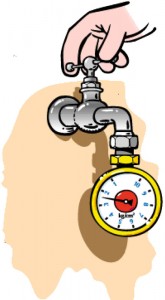
- The exact pressure of the water mains from which the watering system will be fed (for example 4.5 bar). A manometer is necessary to measure the static pressure in the existing water supply network.
- The flow in the supply pipe from which the watering system will be fed. You will get the data about the flow when you place a large container of known volume (for example, a 10-liter bucket) on the water source, open the valve or tap to the end and at the same moment start measuring the time with a stopwatch. When the container (bucket) is full, stop the stopwatch and read the time that has passed until the container (bucket) is full. Let’s say you filled a bucket of water with a volume of 10 liters in 20 seconds. From this data, we can easily conclude that the water flow at the connection in this example is 30 liters per minute.

- Data on the connection to the water source to which the watering system installation will be connected. These data refer to the position, type and dimensions of the connecting pipe.
- Choosing a suitable place for placing the command unit – controller. When choosing the place where the controller will be located, it should be kept in mind that its operation usually requires electricity, although there are also those for which only batteries are sufficient. There are controllers for outdoor installation and those that are installed only indoors. In addition, you should also know that the programmer is usually connected by cable to the electromagnetic valves located at the beginnings of the supply pipelines of the individual zones of the irrigation system. Electromagnetic valves are usually placed in a special plastic shaft made for that purpose.
The accuracy of all the mentioned data is very important for the creation of the watering system scheme, and especially for the precision of the hydraulic calculation, the quality of the designed watering system depends on its accuracy.
Based on the given data, our design team can make a functional diagram of the watering system. With the watering equipment you have purchased from us, and upon your request, you can receive a diagram free of charge, as well as all the necessary advice. Based on them, you will be able to successfully install your own watering system.
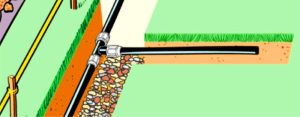
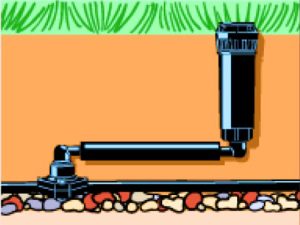
View of the structure of the watering system:
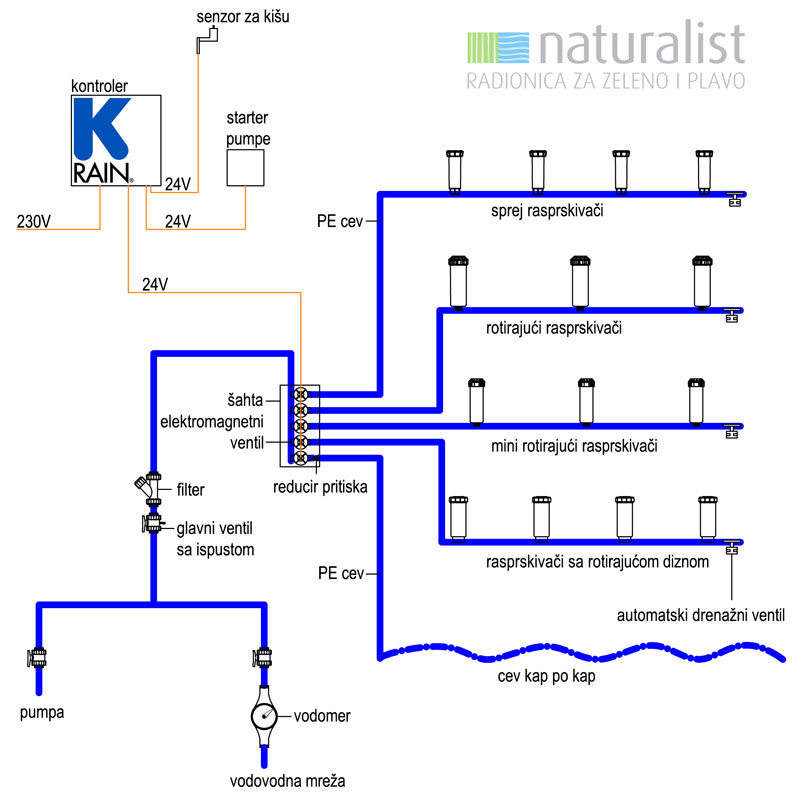
Due to uniform watering, only sprinklers with the same watering effect are installed behind the solenoid valve on the same pipeline line. Rotating sprinklers are not installed on the line with sprays and vice versa. The drip system must be mounted on a separate line.
Installation of an automatic POP-UP watering system
Based on our watering system scheme, you can proceed with the installation of the equipment in the following stages:
1. Measuring and marking
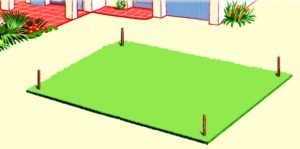
Based on our watering system scheme, mark with stakes the places where the sprinklers should be placed. Be careful not to confuse the position of rotors, sprays, and sprays with rotating nozzles. prepare a PE (polyethylene pipe of the type “okitene” or “alkatan”) by placing it along the future channel. You can straighten the pipe by pressing it with blocks or bricks in characteristic places.
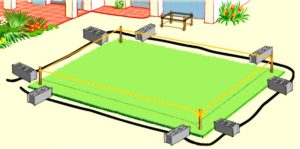
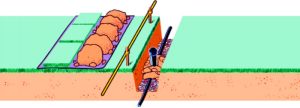
2. Channel excavation
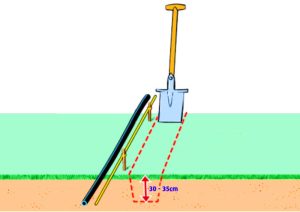
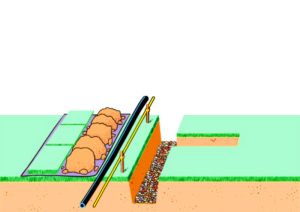
Dig a channel 30-35 cm wide and 30-35 cm deep. If you are using the irrigation system on an existing lawn, it will be easiest for you to place a nylon sheet next to the channel, on which you will carefully arrange the grass sod that you removed. At the end of the grass sod, deposit the excavated soil from the canal, and its bottom should be covered with sand before laying the pipe.
3. Pipeline installation

Place plugs on the ends of the pipes or protect them with nylon to prevent dirt and sand from entering the pipes. Lay the pipes in the channels and use the compression fittings to connect the forks. Before installing the fittings, you can slightly taper the ends of the pipes with a sharp knife to make it easy to install the fittings. At this stage, it is necessary to install all electrical installations – cables for electromagnetic valves and a rain sensor.
4. Mounting clamps


You need clamps to mount the sprinkler. You will mount them on the part of the pipe in the area of the sprinkler. Insert a short board under the pipe, and over the channel in the form of a bridge. Pull the lower part of the clamp under the pipe and rest it on the board. Place the sealing rubber of the upper part of the clamp in the appropriate slot and firmly connect it to the lower part of the clamp with the help of screws, enclosing the pipe so that the threaded opening is vertical. Use a Ø10 or Ø12 mm wood drill bit (with a pin at the top) to drill a hole on the upper part of the pipe through the aforementioned opening. Be careful not to drill the bottom part of the pipe as well.
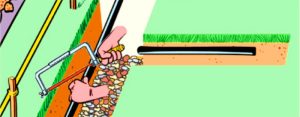
5. Pipeline flushing
Before installing sprinklers and electromagnetic valves, it is necessary to flush all pipelines in order to remove all dirt from the pipes and plastic shavings created during the installation of clamps. If the pipeline is not flushed, count on clogging of the filters in the sprinklers, which reduces their preforms, and it may also happen that the electromagnetic valves are permanently damaged.
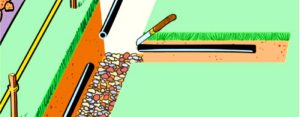
6. Sprinkler installation

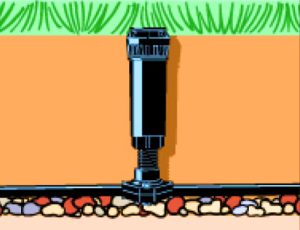
You can mount the sprinkler using an extended nipple directly on the clamp or using elbow-couplings and a piece of pipe about 0.5 m long. This second method is more favorable because it ensures the elasticity of the assembly and easier leveling of the sprinkler with the surface of the field. The tip of the sprinkler must be level with the ground. When leveling the sprinkler, the sprinkler body should first be fixed vertically with earth. After positioning the sprinklers and installing all the underground installations, the channels should be covered with earth and covered with grass sod with good compaction, so that the terrain does not settle.
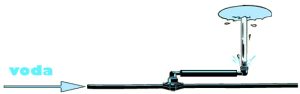
7. Installation of electromagnetic valves
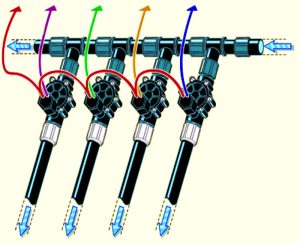
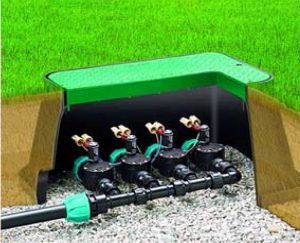
Solenoid valves are most often mounted in special plastic shafts using distribution with Dutch T-splitters. The cables from the electromagnetic valves are connected to the control device – the controller. One wire of each solenoid valve is connected by a common wire to the controller. The remaining wires from the solenoid valves to the control device are installed separately. When connecting the wires, waterproof connections should be used, even though it is a low, 24V voltage.
8. Setting up the watering system and putting it into operation
Depending on the model, the controller can be installed indoors or outdoors. To operate an automatic watering system, the controller must be programmed. It is easy to do with the help of detailed instructions. The controller automatically manages the watering system by determining the start and end times of watering with a multitude of options. When it rains, the rain sensor stops the watering system from running, saving water and preventing overwatering. The rain sensor is mounted in a sunny location where rain can wet it, but not sprinkler water. It is wired to the controller.
For the normal operation of the watering system, it is necessary to set the appropriate watering area on the sprinkler heads, i.e. the desired angle and range of the jet.